so my first intentions were to upload videos to youtube on a regular basis...starting out with organization of my scrapbook room, followed by technique videos. I got 4 uploaded...and then took a little hiatus. oops. well...it has been crazy with transitioning my downtown scrapbook studio to a craft consignment store...and my mom finding out she has Stage 4 terminal cancer...so i am sure you understand. (ready for life to get back to normal for sure...)
here is my latest...it is about how i organize my letters. man, this has been a struggle for me for some reason. they have been in vertical folders, notebooks, hanging by color...but finally i have found a system(s) that works! i noticed a few things about myself when watching the video (reminder...i am not about doing multiple takes...so they are very imperfect):
i say 'um' alot
i really need to thoroughly clean my room (and get the ceiling tiles put back up...yikes, sorry about that!)
i talk with my hands...alot!
so with that said...enjoy! 8 )
(If you can't see the whole screen, click here.)
Showing posts with label scrapbook studio. Show all posts
Showing posts with label scrapbook studio. Show all posts
Thursday, June 23, 2011

Sunday, January 23, 2011
All About Vintage...new videos!
These videos highlight my vintage pieces I have in my room and how I use them to organize some of my supplies...enjoy!
You may also view by clicking here.
You may also view by clicking here.
You will probably see some of these pieces again a I talk about the individual supplies...but this will provide an overall look into how I have incorporated antique pieces into my room. Enjoy! 8 )
You may also view by clicking here.
You may also view by clicking here.
You will probably see some of these pieces again a I talk about the individual supplies...but this will provide an overall look into how I have incorporated antique pieces into my room. Enjoy! 8 )
Friday, January 7, 2011
my first video blog...
is now up...please forgive the 'ums' and the shaky camera. 8 ) this was truly an experiement! i wanted to give you all a quick tour of my scrapbook room and talk about some future video blogs i am working on...enjoy!
(If you can't seen entire screen, view here.)
(If you can't seen entire screen, view here.)
Wednesday, November 10, 2010
This is how I roll...

This is the aftermath of doing the December Daily album (and I'm sure to have this happen again when it comes time to actually put it together in December)...YIKES! But you know what-this is how I work best. I like to have everything out-it is very inspiring for me to see all of the wonderful product. This has become my organization mantra as well. At one time, everything was neatly put away in drawers-and I was uninspired, not to mention I would forget what I had! So, I adjusted styles and switched to an organization style of organized yet displayed. Love it!
Days 13-25 coming soon!
By the way, do you think I have enough Christmas product???
Monday, September 6, 2010
My Home Scrapbook Studio
I recently moved my scrapbook studio, which allowed me to start fresh...new paint, new organization. The room is choppy, so I will go wall by wall, focusing on how I have chosen to organize certain supplies.
Here is a photo entering into my space:

As you walk in, to the left is a little wall which has a door entering into a bathroom, and next to that I have a hanging organizer with bits and pieces...at some point, I want to do something different with this, but it works for now. I like the clear pockets, because inside them are pieces I really want/need to use up and being able to see them increases the chance of that happening. Below the organizer, I have a handmade book case (made by my father) with vintage books. I don't use these for scrapbooking, they are there more or less for decoration/inspiration. I love the feel, color, and smell of old books!


To the right is a built-in shelf unit. Here I organize albums, projects, kits, chipboard sheets, page protectors, and alphas. In the bottom are my organizers for when I go on crops. Also some other random things--a couple of those 12x12 bins have ideas in them, a couple have my enlarged photos--this shelf is kind of a mish mosh of stuff). 8 )

I put mini albums/projects in magazine holders. I organize my alphas by color in clear drawers.


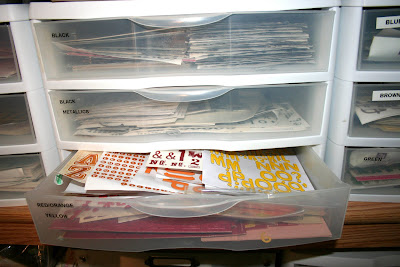
Next to these shelves is a 3 drawer unit. The bottom 2 drawers are full of Christmas embellishments. The top drawer is full of card-related supplies. On top is a Clip It Up made by Simply Renee (purchased from Scrapbook.com-this is one of 3...)


Next to that is a door to my hubby's office. Hanging from that is a shoe hanger that I use to organize all of my alpha stamps. They are organized by letter.

A look at the entire wall:

Looking straight ahead while entering, is some cupboard space. Here, I store items that aren't very 'pretty.' On the shelf, I have patterned paper that is organized by theme (you will see more patterned paper later...).


Next to that is a little black shelf where I store basic tools, dyes, buttons, staples, mesh, and vintage buttons. (Note that 3-frame piece above it...I made that at CKU/Chicago in 2007 and have yet to put photos in it!)


As you turn into the main part of the room (to the left), there's a TV stand, my dry erase board that displays completed layouts and more built-in shelves.


TV Stand: There are shelves on all 3 sides...I use them mostly to store mini-albums about me. It also holds movies, a vintage mirror, my Scentsy (which came white and the decorations are rubons...how cool is that!), a spinner project still in the making (focused on the Mackin family), and a vintage scale topped with a vintage bucket full of vintage goodies. I am all about finding items that are functional, yet add to the vintage deco style.


The vintage cylinder piece next to the TV stand holds vintage fabric pieces, including old quilt squares, etc.

The shelves on this wall hold more mini albums/projects, my paint supplies, vintage books/dictionaries that I do use for scrapbooking, inks, distress items, idea books, fabric and sewing related supplies, and my photos.
The top shelf is full of magazine holders full of mini-albums and projects.

I use a vintage pail to hold all of my paint supplies...(that mirror piece next to the pail is something I made in Tim Holtz's class at CKU Chicago in '07)

I organize my paints by color in turning spice holders.

I love collecting old dictionaries and books I can pull pages out and use on pages. I use the old sewing drawers for my Stampin' Up roller and supplies.I have a few idea magazines next to that piece...I have hundreds of others, but I keep them at my 'business' scrapbooking studio for croppers to have access to.


This vintage case holds my cat eye and mini ink pads in the top, and distressing tools in the bottom.

This shelf holds vintage fabric, trims, sewing tools and my craft sewing machine.


I use the LOM system for my pics. I still have a few in photo boxes, mainly my wedding and pictures from my youth.

Now on to patterned paper, solid paper and scraps...I use vintage suitcases to hold these. I organize patterned paper by color (that did not fit into the themed holders)with solid colored cardstock. I separate my scraps by solids and patterns and have them underneath. This has worked out wonderfully-it is all at my fingertips and I love the vintage suitcases!


In front of my table, I have 2 stand-up 3-tiered fruit basket pieces that hold my loose flowers and bling. I got these at Hobby Lobby...again, I love being able to see these pretty supplies!

On my table, I have very few things...my computer, my trimmer and adhesive, and then this little set up-a vintage yellow bucket (one of my favorite pieces of all time)holds my journaling markers, a flip calendar with inspiration and a little jar of beads.


A view from my table...

My scrapbook table is an old table that used to be my grandparents dinner table at the farm.
Following along the wall that has my vintage suitcases to the area behind my table...
I have had this shelving piece for a few years and I recently spray painted it cream. It is perfect for storing little containers (vintage of course)full of supplies. Sitting next to it is a vintage bucket of flowers (that are in packaging).


Some close ups of storage pieces:
Stickles

Glitter

Fabric Tags

Stampers

Stampers and Pins

Clocks

Tapes


Loose bling

The 3 box containers are antique cigar boxes. Their colors are YUMMY!
Items on top of this piece:
Brads!!! The top is full of vintage jewelry. LOVE the inspiration this provides.

Vintage trims...

More trims...(this isn't typically so full, but it has some additional ribbon in it that I need to get put away in the correct spot (ribbon organization coming up)

Borders:


In the corner is a TALL spray-painted brown shelving unit. This works perfectly for stacked clear containers that hold bits and pieces:

I have the following labels on these: butterflies/birds/insects, hearts, flowers, stars, chipboard buttons, arrows, princess items, punctuation, trees/vines, flourishes, photocorners, circles and squares, snowflakes, skulls, keys. (Some are combined). This system has been a work in progress, but totally works for me. I tend to buy packages that hold misc. shapes in them (think Basic grey, K & Company)-I split them and organize accordingly.

I have a table against the back wall that holds a clip-it-up and a bin organizer that I found at Holly Lobby. Here I organize tags, journaling blocks, etc. by color. (Yes, they are a bit full...time to sort thru and purge). The top 4 hold tickets, transparency items, multicolor items, and other bits and pieces that I wanted to keep separate from the rest. There is also a jumbo clip-it-up on the floor beneath the table (not ideal, but no room elsewhere).

In the corner of this table, I have what I call my "get messy" area-a little spot where I can do stamping, inking, misting, painting, etc. I have 2 shelves that hold inks and stamps, glimmer mist, etc. (Underneath my table I have binders of acrylic stamps, can not see in the pic)
Glimmer Mist:

Glass glitter (idea inspired by Jenni Bowlin)

The last little section of this room is a little nook that leads to a door with our water softener in it. Here I have a vintage stereo which serves as a table for my printer and scanner.


Also has a storage piece that holds my loose alphas and alpha collections...

And two large 3 drawer plastic organizers that holds memorabilia. Each child has a drawer--perfect place to keep their school papers, etc.

View of the back part of the studio:

Some other bits and pieces:
Ribbon storage: After trying numerous ideas for ribbon storage, I settled on the Pull-Eze. I have 2 of them and they are perfect for picking up and taking to crops.

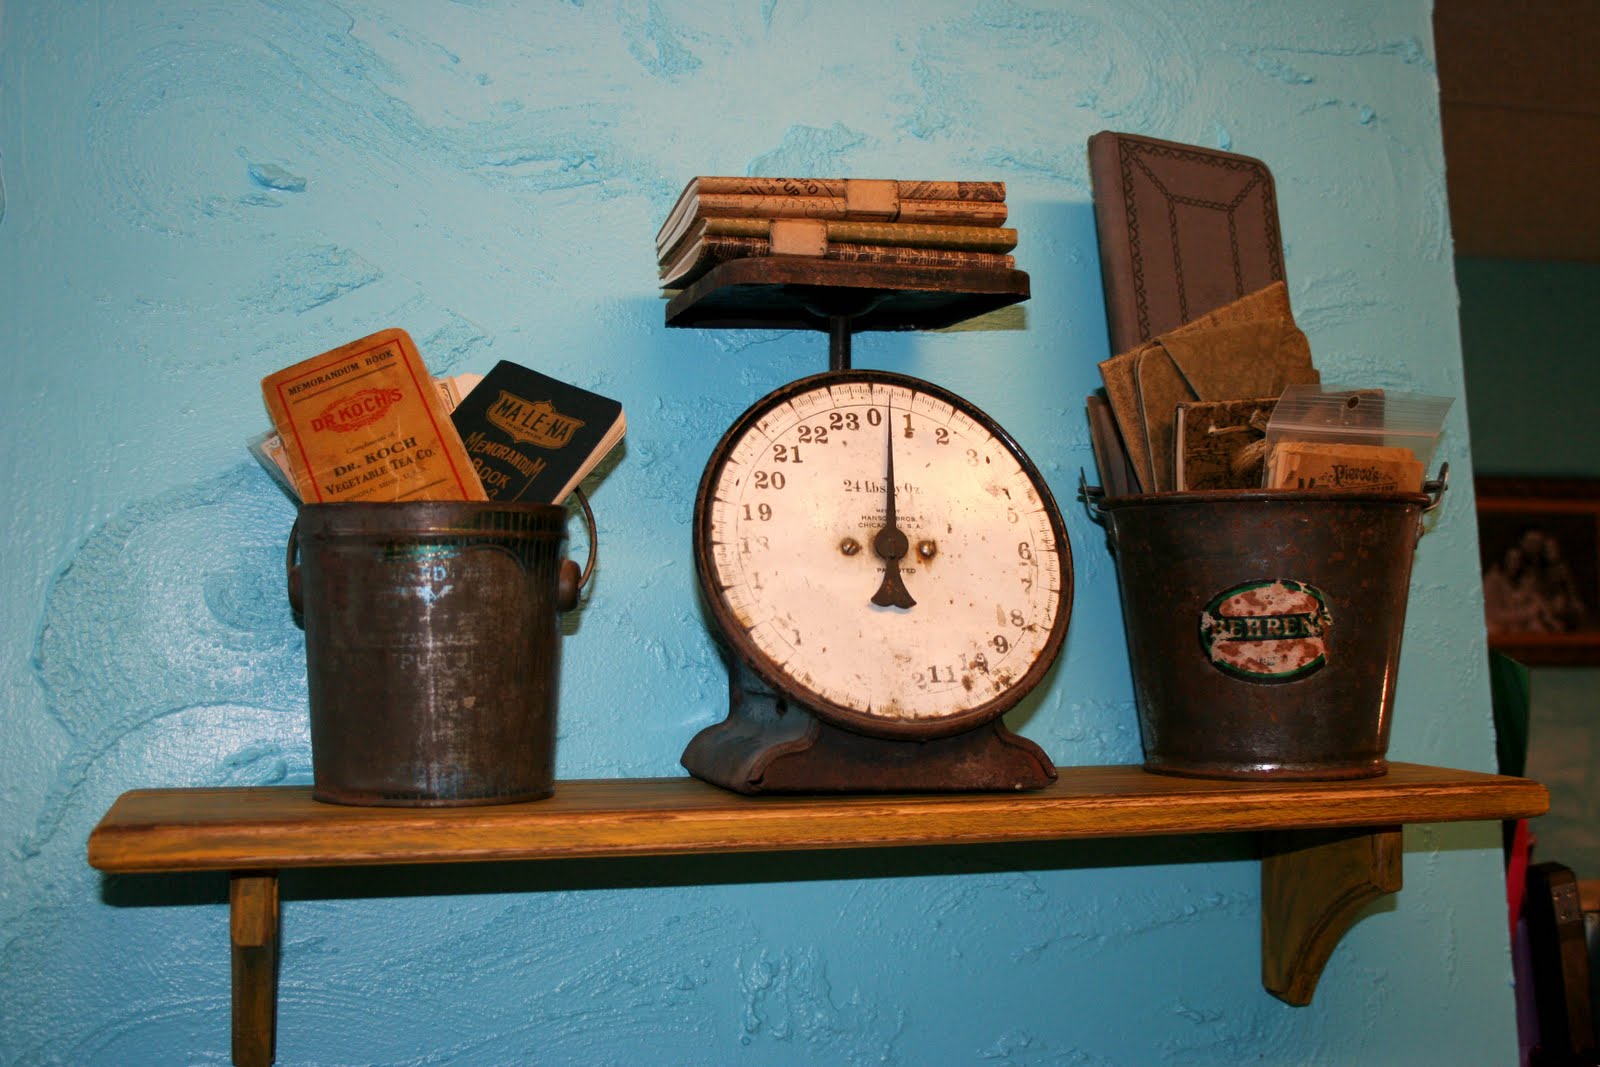
A shelving unit by my table: LOVE this. A vintage scale and 2 vintage pails with vintage ephemera, antique pictures, etc.

Punches: I keep my punches in brown velvet box underneath my table. Serves as a footrest for me too. 8 )

And lastly, since I was inspired to blog this (although I have thought about doing this for a LONG time...), by May Flaum's Use Your Stash class on bigpicturescrapbooking.com, my last piece is a new basket that is my "Use It Up!" basket-items that are either old or partially used packages that I want to get used up or moved out.

It has definetely been a process putting this room together...figuring out what works for me and what keeps me inspired. At one time everything was nicely organized and hidden away in drawers, but I found that did not work for me. I like to see what I have...it makes me more apt to use it. I used to also forget about what I had. This way, I see it on a regular basis and I know where to find it because I have a system.
Thanks for looking!!!
Here is a photo entering into my space:

As you walk in, to the left is a little wall which has a door entering into a bathroom, and next to that I have a hanging organizer with bits and pieces...at some point, I want to do something different with this, but it works for now. I like the clear pockets, because inside them are pieces I really want/need to use up and being able to see them increases the chance of that happening. Below the organizer, I have a handmade book case (made by my father) with vintage books. I don't use these for scrapbooking, they are there more or less for decoration/inspiration. I love the feel, color, and smell of old books!


To the right is a built-in shelf unit. Here I organize albums, projects, kits, chipboard sheets, page protectors, and alphas. In the bottom are my organizers for when I go on crops. Also some other random things--a couple of those 12x12 bins have ideas in them, a couple have my enlarged photos--this shelf is kind of a mish mosh of stuff). 8 )

I put mini albums/projects in magazine holders. I organize my alphas by color in clear drawers.


Next to these shelves is a 3 drawer unit. The bottom 2 drawers are full of Christmas embellishments. The top drawer is full of card-related supplies. On top is a Clip It Up made by Simply Renee (purchased from Scrapbook.com-this is one of 3...)


Next to that is a door to my hubby's office. Hanging from that is a shoe hanger that I use to organize all of my alpha stamps. They are organized by letter.

A look at the entire wall:

Looking straight ahead while entering, is some cupboard space. Here, I store items that aren't very 'pretty.' On the shelf, I have patterned paper that is organized by theme (you will see more patterned paper later...).


Next to that is a little black shelf where I store basic tools, dyes, buttons, staples, mesh, and vintage buttons. (Note that 3-frame piece above it...I made that at CKU/Chicago in 2007 and have yet to put photos in it!)


As you turn into the main part of the room (to the left), there's a TV stand, my dry erase board that displays completed layouts and more built-in shelves.


TV Stand: There are shelves on all 3 sides...I use them mostly to store mini-albums about me. It also holds movies, a vintage mirror, my Scentsy (which came white and the decorations are rubons...how cool is that!), a spinner project still in the making (focused on the Mackin family), and a vintage scale topped with a vintage bucket full of vintage goodies. I am all about finding items that are functional, yet add to the vintage deco style.


The vintage cylinder piece next to the TV stand holds vintage fabric pieces, including old quilt squares, etc.

The shelves on this wall hold more mini albums/projects, my paint supplies, vintage books/dictionaries that I do use for scrapbooking, inks, distress items, idea books, fabric and sewing related supplies, and my photos.
The top shelf is full of magazine holders full of mini-albums and projects.

I use a vintage pail to hold all of my paint supplies...(that mirror piece next to the pail is something I made in Tim Holtz's class at CKU Chicago in '07)

I organize my paints by color in turning spice holders.

I love collecting old dictionaries and books I can pull pages out and use on pages. I use the old sewing drawers for my Stampin' Up roller and supplies.I have a few idea magazines next to that piece...I have hundreds of others, but I keep them at my 'business' scrapbooking studio for croppers to have access to.


This vintage case holds my cat eye and mini ink pads in the top, and distressing tools in the bottom.

This shelf holds vintage fabric, trims, sewing tools and my craft sewing machine.


I use the LOM system for my pics. I still have a few in photo boxes, mainly my wedding and pictures from my youth.

Now on to patterned paper, solid paper and scraps...I use vintage suitcases to hold these. I organize patterned paper by color (that did not fit into the themed holders)with solid colored cardstock. I separate my scraps by solids and patterns and have them underneath. This has worked out wonderfully-it is all at my fingertips and I love the vintage suitcases!


In front of my table, I have 2 stand-up 3-tiered fruit basket pieces that hold my loose flowers and bling. I got these at Hobby Lobby...again, I love being able to see these pretty supplies!

On my table, I have very few things...my computer, my trimmer and adhesive, and then this little set up-a vintage yellow bucket (one of my favorite pieces of all time)holds my journaling markers, a flip calendar with inspiration and a little jar of beads.


A view from my table...

My scrapbook table is an old table that used to be my grandparents dinner table at the farm.
Following along the wall that has my vintage suitcases to the area behind my table...
I have had this shelving piece for a few years and I recently spray painted it cream. It is perfect for storing little containers (vintage of course)full of supplies. Sitting next to it is a vintage bucket of flowers (that are in packaging).


Some close ups of storage pieces:
Stickles

Glitter

Fabric Tags

Stampers

Stampers and Pins

Clocks

Tapes


Loose bling

The 3 box containers are antique cigar boxes. Their colors are YUMMY!
Items on top of this piece:
Brads!!! The top is full of vintage jewelry. LOVE the inspiration this provides.

Vintage trims...

More trims...(this isn't typically so full, but it has some additional ribbon in it that I need to get put away in the correct spot (ribbon organization coming up)

Borders:


In the corner is a TALL spray-painted brown shelving unit. This works perfectly for stacked clear containers that hold bits and pieces:

I have the following labels on these: butterflies/birds/insects, hearts, flowers, stars, chipboard buttons, arrows, princess items, punctuation, trees/vines, flourishes, photocorners, circles and squares, snowflakes, skulls, keys. (Some are combined). This system has been a work in progress, but totally works for me. I tend to buy packages that hold misc. shapes in them (think Basic grey, K & Company)-I split them and organize accordingly.

I have a table against the back wall that holds a clip-it-up and a bin organizer that I found at Holly Lobby. Here I organize tags, journaling blocks, etc. by color. (Yes, they are a bit full...time to sort thru and purge). The top 4 hold tickets, transparency items, multicolor items, and other bits and pieces that I wanted to keep separate from the rest. There is also a jumbo clip-it-up on the floor beneath the table (not ideal, but no room elsewhere).

In the corner of this table, I have what I call my "get messy" area-a little spot where I can do stamping, inking, misting, painting, etc. I have 2 shelves that hold inks and stamps, glimmer mist, etc. (Underneath my table I have binders of acrylic stamps, can not see in the pic)
Glimmer Mist:

Glass glitter (idea inspired by Jenni Bowlin)

The last little section of this room is a little nook that leads to a door with our water softener in it. Here I have a vintage stereo which serves as a table for my printer and scanner.


Also has a storage piece that holds my loose alphas and alpha collections...

And two large 3 drawer plastic organizers that holds memorabilia. Each child has a drawer--perfect place to keep their school papers, etc.

View of the back part of the studio:

Some other bits and pieces:
Ribbon storage: After trying numerous ideas for ribbon storage, I settled on the Pull-Eze. I have 2 of them and they are perfect for picking up and taking to crops.

A shelving unit by my table: LOVE this. A vintage scale and 2 vintage pails with vintage ephemera, antique pictures, etc.
Punches: I keep my punches in brown velvet box underneath my table. Serves as a footrest for me too. 8 )

And lastly, since I was inspired to blog this (although I have thought about doing this for a LONG time...), by May Flaum's Use Your Stash class on bigpicturescrapbooking.com, my last piece is a new basket that is my "Use It Up!" basket-items that are either old or partially used packages that I want to get used up or moved out.

It has definetely been a process putting this room together...figuring out what works for me and what keeps me inspired. At one time everything was nicely organized and hidden away in drawers, but I found that did not work for me. I like to see what I have...it makes me more apt to use it. I used to also forget about what I had. This way, I see it on a regular basis and I know where to find it because I have a system.
Thanks for looking!!!
Subscribe to:
Posts (Atom)